Just Another (Spammy) Day At The Office

So one sits down at the computer this morning only to find several spam comments in the moderation queue. It seems the drug spammers have found my site again. But I – and all the bloggers who I have created wordpress blogs for – have a secret weapon in the fight against spammers. So secret in fact that I haven’t told them much about it or how to use it. So that is why I am writing this post.

First let us find out what drug spam looks like.

Spam

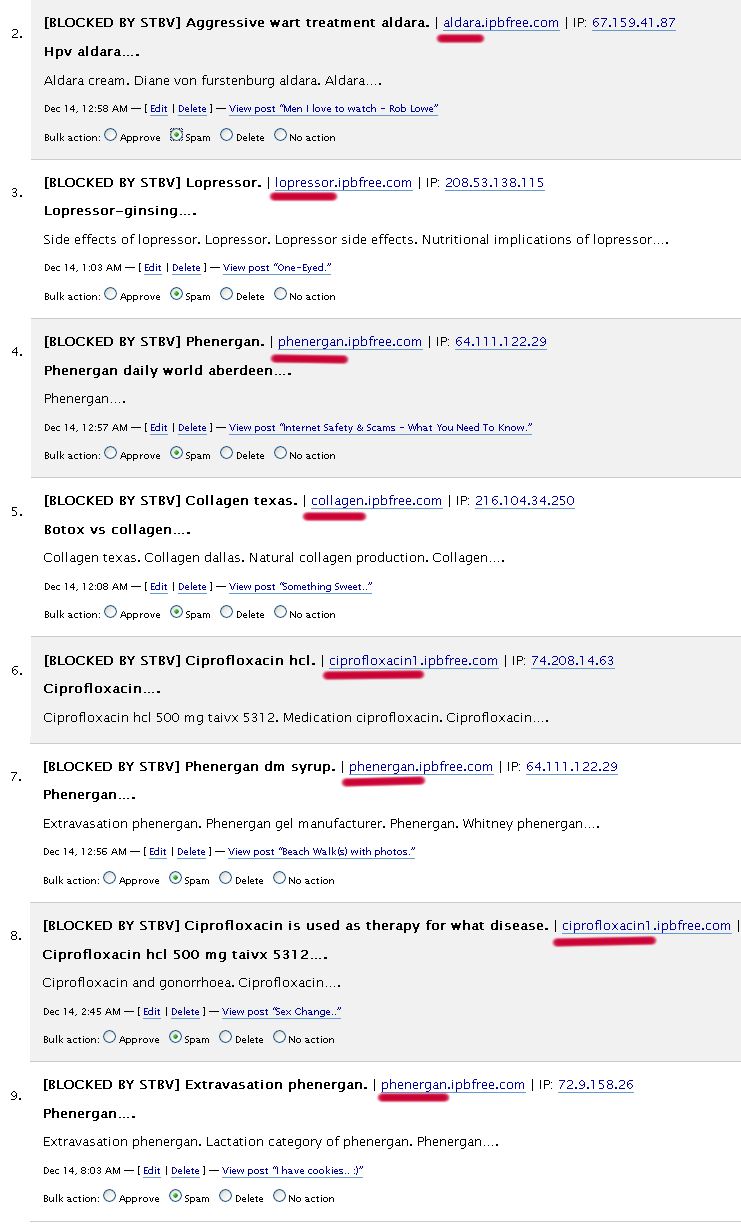
You see the words underlined in red in the URL’s? Those are the drug names. They will always be spelled right. You can block the drug words within the comments themselves using the TanTan Noodles Simple Spam Filter plugin. If you only did that, you would start to see the drug names spelled wrong within the comments. The spam would not stop. So my Other Half modified our version of TanTan Noodles to enable you to block words within the URL’s. Here’s how you do it.

Tan Tan Noodles Simple Spam Filter

First of all, where do you find this spam filter?

Spam Filter

Comments (light blue)

Spam Filter (dark blue)

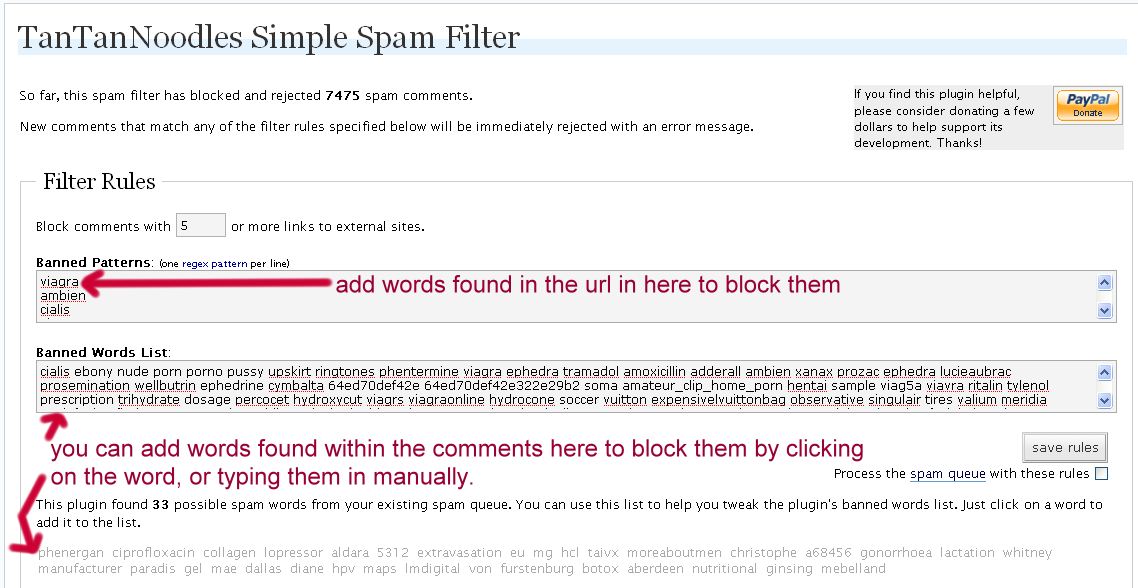
Here is the screen you will see when you click on spam filter – yours may not have all the words mine does, though.

Spam

How To Block Spam –

All you need to do is enter in the word you want to block. If it is a word that was in the URL, put it under banned patterns. If it is a word found within the comments, put it into the banned words list. The plugin looks at your Akismet spam and puts words that you may want to add at the bottom of the page. You can click on those words to add them to the banned words list. Once you have finished putting the words in, click on save rules. Then you’re done – and so are the spammers.

What will the spammers see?

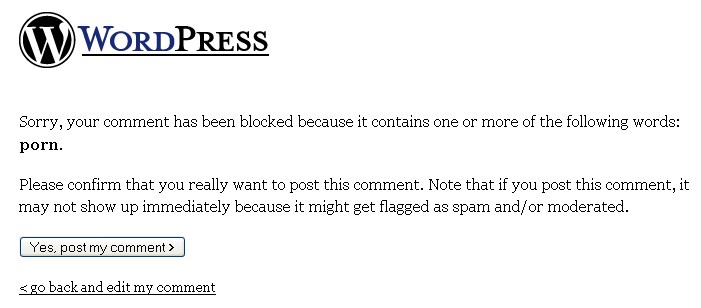
Not a great deal, because they are usually robots or computer scripts, not real people. But if they were real people they would get this screen –

Spam

If they are a robot or a computer script, they can’t click on the button. That is how the spam gets blocked. From time to time it may be possible that one of your regular commentors will use a banned word and they will see this screen. It tends to freak them out a little. So it is a good idea to try and keep the banned words to words not used in every day comments.

Take Care With Banned Words.

You will see a bit of spam that simply says “Hi, great site” – I blocked the word great for a while but then I unblocked it after a commentor told me they saw the screen and they weren’t sure what to do..  it is easier for me to manually handle that kind of spam than to scare my commentors. They don’t show up anywhere near as often as the drug spammers do. Overnight I had 8 drug spam comments and another 2 more showed up before I put in the new drug words.

Any Questions?

If you have questions, the comments section is open. Feel free to ask away!

Wordpress Training Wheels

WordPress – Writing A Post.

There’s a few basic things you need to know in order to write a post in WordPress. We’re going to take a look at the write posts screen and explore a couple of the features. This post ended up being a lot longer than I expected, so check back tomorrow for more on writing a post, in particular what options you have in the right sidebar and how to post in the future.

Where Is Write Post?

Write WordPress Post

Click on Write (light blue)

Click on Write Post (dark blue)

The Write Post Screen

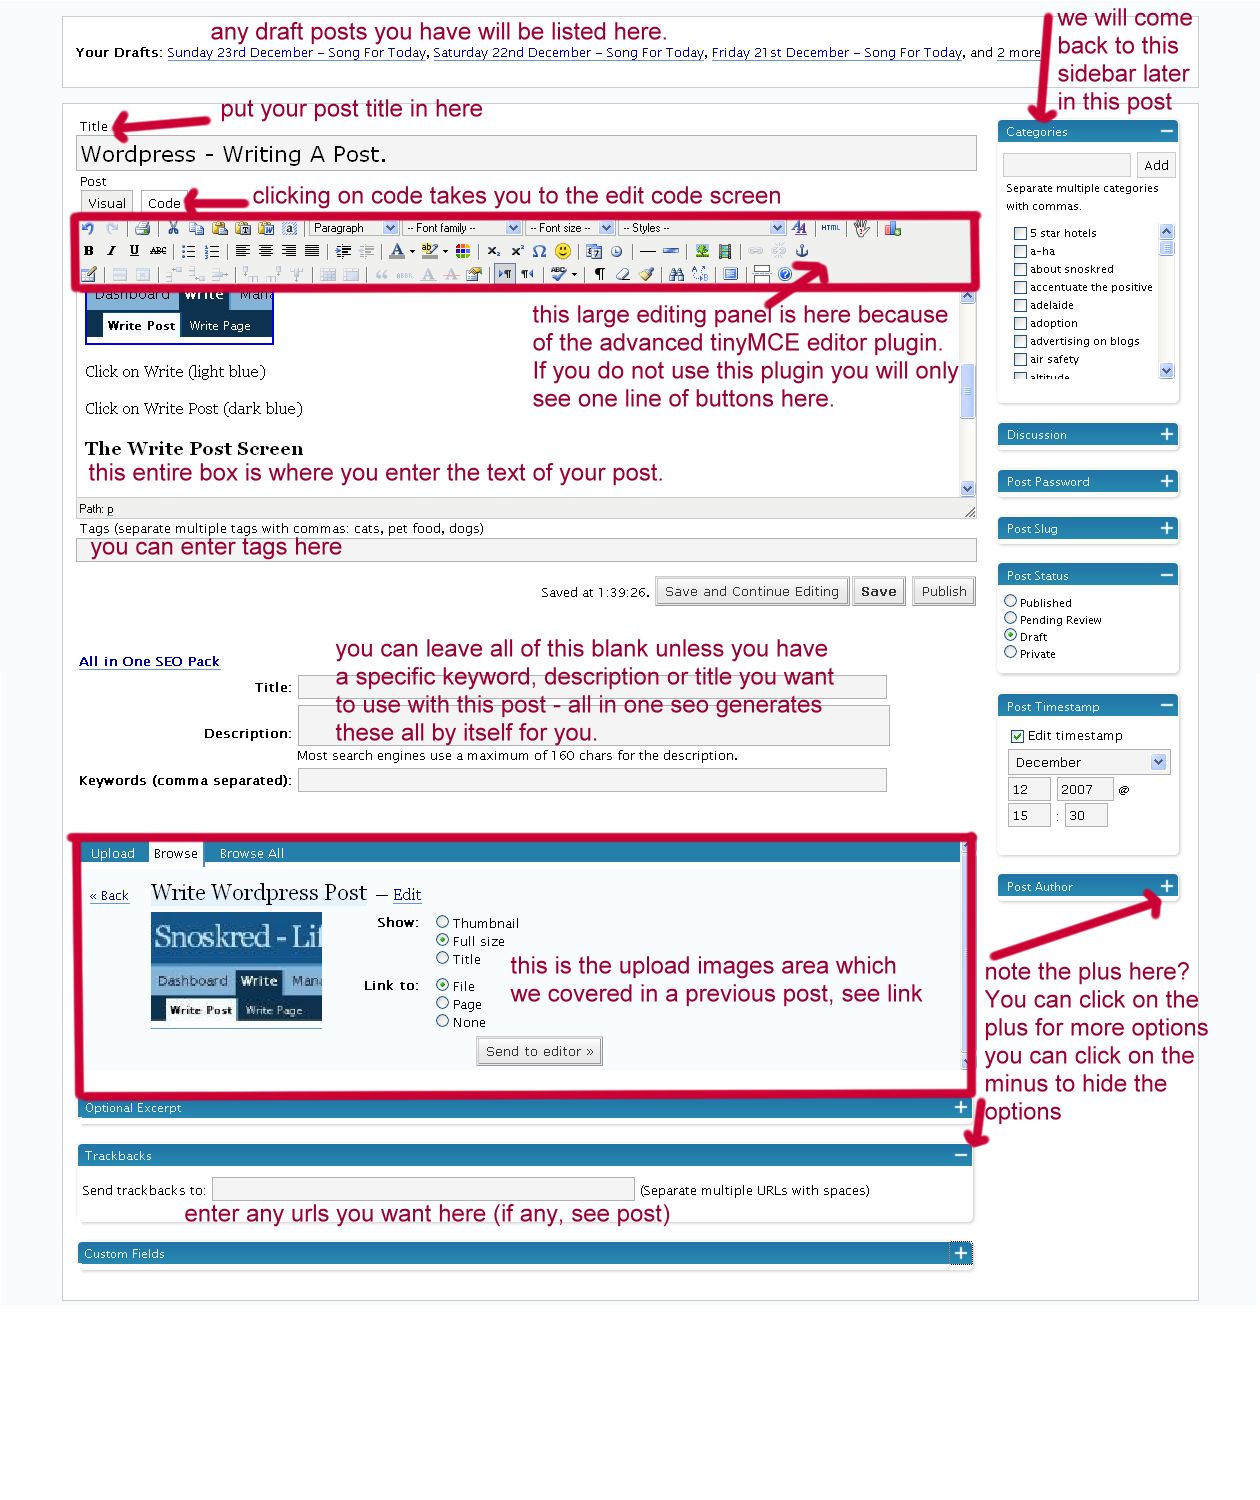
The write post screen may look confusing to those of you switching over from Blogger however it is very similar to what you had over there. It does contain more options. Here is an image of how my write post screen looks –

Wordpress Write Post Page

You can customise the height of the editing box and I have done that, so yours may look a little different. If you want to make your editing box taller, go to –

options (light blue)

writing (dark blue)

Size of the post box – I believe the default is 10, so you can adjust the number upwards if you want it bigger. Mine is set to 15.

The Advanced tinyMCE editor.

If you are using the Advanced tinyMCE editor, you can tell what the buttons do simply by hovering your mouse over them. There are some buttons you will use more than other buttons. Headings and adding links are two ones I constantly use, so let us take a look at how they work.

Headings.

In HTML you have a couple of choices when it comes to headings. The best choice and the one that means less work for you is to use the header tags. These tags are also used by some search engine bots when they visit your site to pick up keywords so it is a good idea to use the header tags rather than make the text bigger and bold manually.

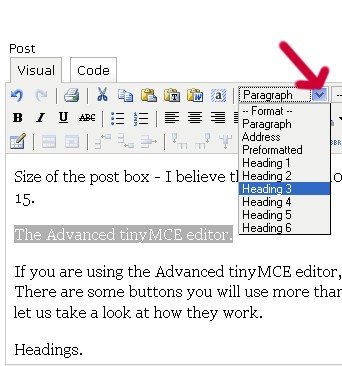
Advanced tinyMCE gives you a little drop down box where you can pick the header tags.

Headings Drop Down Box

Simply highlight the text you want as a heading, then click on the little arrow to drop the box down, and choose what header tag you want to use. I highly recommend you go in and play with this. Perhaps make yourself a draft post (don’t post it!) that looks like this –

Header 1

Header 2

Header 3

Header 4

Header 5
Header 6

Just so you can see what they look like. You can preview a post at any time by clicking on preview. Don’t worry, it won’t take you away from the page you are writing the post on. Mine opens in a new tab, yours may open in a new window.

Adding Links

This is something we bloggers do constantly. You have a lot of extra options thanks to the Advanced tinyMCE editor. Some of them are quite complicated and I don’t know what they do. I’ll only mention the ones you are most likely to need or use. Here’s how you make a link.

Highlight Text

Use your mouse to highlight the text you want to put a link on.

Insert/edit link

Click on Insert/edit link, which is the little chain link icon, I put a circle around it for you.

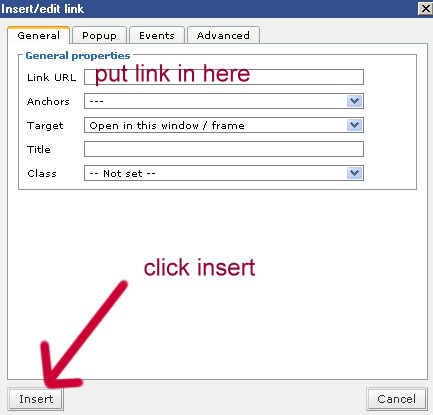
When you do that a little box will pop up. If you want, all you need to do is enter in the link where it says link url, click insert, and you’re done.

Basic linking

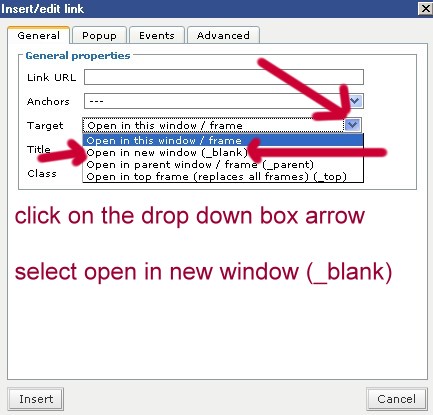
Some bloggers want their links to open in a new window so that when a reader clicks on the link, it does not take them away from their site. Me personally, I don’t recommend doing this. In general web etiquette it is considered a bit rude to force people to open links in a new window. I know if I middle click on a link it will open in a new window. I know I can right click and open it in a new tab if I want to. I also know how to get back to the site I was on if I click away from it. But just in case you want to do it –

Open link in new window

Click on the little drop down box arrow, and select open link in new window.

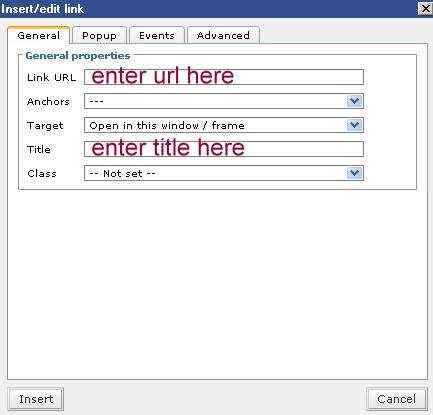
The final linking thing I will show you is how to give your link a title. All you have to do is enter in some text where it says title. How easy is that!

Link Title

Then click insert, and you’re done. Want to see what it does? Hover your mouse over this link right here. You see how a little box pops up with text in it? Like this?

Hover mouse

Of course there are a lot more features in the write post screen. I’ll be talking about them more over the next few days.

Other Great Links –

Image Resizing Made Simple – in case you missed Sephy’s explanation of how to easily resize images.
How to Add a YouTube Video to a WordPress Blog – Note that the youtube brackets plugin is a part of the standard package I give you when I install your wordpress blog. Great post Meg, I was going to cover it at some point and now I don’t need to. ;) Yay less work for me!

Wordpress Training Wheels

WordPress – Uploading An Image

This is a quick one for Lightening. It is simple once you know how – and know a couple of important rules. The most important one is this –

WordPress DOES NOT resize your pictures the way Blogger used to.

You have two options. You can show a thumbnail and people can click for a larger image.
Enter Title Here - when people hover, they will see this
Or make sure your images are less wide than your content box. I generally try to stick to around 430 wide for my images.
Enter Title Here - when people hover, they will see this
Realistically, people don’t click on images to make them bigger unless they are really small, this much I can tell you from experience. So I personally think the options here are excellent.

Uploading An Image

Scroll down the write post page until you come to the upload images box. It is just below All In One SEO if you have that installed. Where does it put the images when you upload them? On your server space that comes with your blog, usually into your wp-content/images folder.

Image Upload Box on WordPress

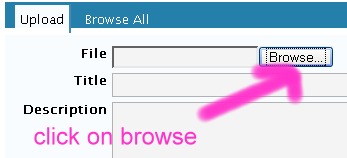
Click on browse.

Click On Browse

The following box will popup. Find the image you want to upload which should be on your computer somewhere and click on open.
Popup Box
Once you have done this the popup box will go away. Now if you did not want a title or description for your photo, you could press upload now and it would upload the image. However putting a title on your photo means that when someone hovers their mouse over it they will see the title you put in, and it means the search bots will pick that title up. If you look at my song of the day photos you will see they always have a title that tells you what the photo is actually of. So it is worth putting a title in.

Title and Description

Once you have entered your title and a description if you want one, click on upload. This may take a few moments depending on the size of your image. Once it is done you will see this –
Image Upload Box on WordPress
You can choose if you want a thumbnail or a full size image. Just be aware that if your full size image is huge, it may throw out your sidebars. So unless you have made the image smaller than your content area, always choose thumbnail.

I’m not sure what the link to options actually do. I am sure someone reading this does, and if they could explain it in the comments I’d appreciate it greatly. ;) I just stick to the one I know, which is file.

Questions? Comments?

The comments section is open, so feel free to ask any questions you may have. Hopefully I have the answers! :)

Wordpress Training Wheels

Daily WordPress Tasks

When I set up a new WordPress blog, I always set it to moderate first time commentors. It turns out this isn’t something Blogger users are used to. On Blogger you had the choice of moderate all the time, or not at all. WordPress has a lot more options and a lot more control. But this also means you have a few things you need to do regularly – daily at the least. I tend to do these tasks several times during each day.

Daily Task #1 –

Comment Moderation

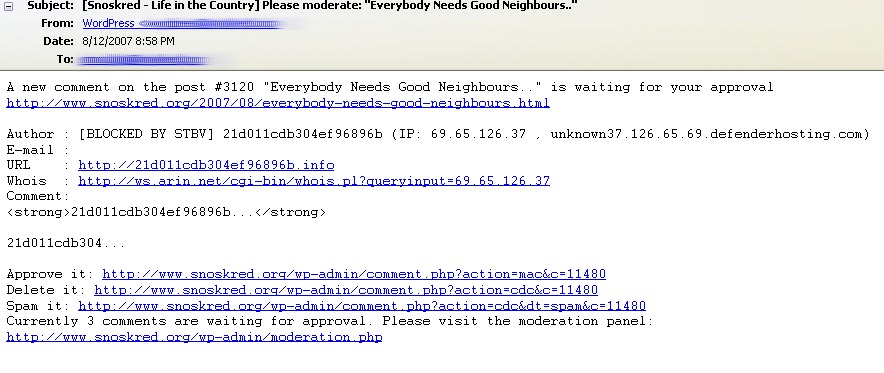
There’s some very good reasons that you want to have moderation for the first comment someone makes to your blog. You want to stop spammers before they even get started. You may want to welcome legitimate first time commentors by sending them a personal email, and the email you get from WordPress is a good heads up to remind you to do it. It also contains the email address and website of a commentor to make it easy for you to email and visit their site. The email you get looks like this – click for a larger view. You can click for a larger view with most of the images in this post.

Wordpress Email

There are links within the email you can click as you can see. When you log in to your WordPress Dashboard, you can also see if you have any comments in moderation from that screen.

Wordpress Comments In Moderation

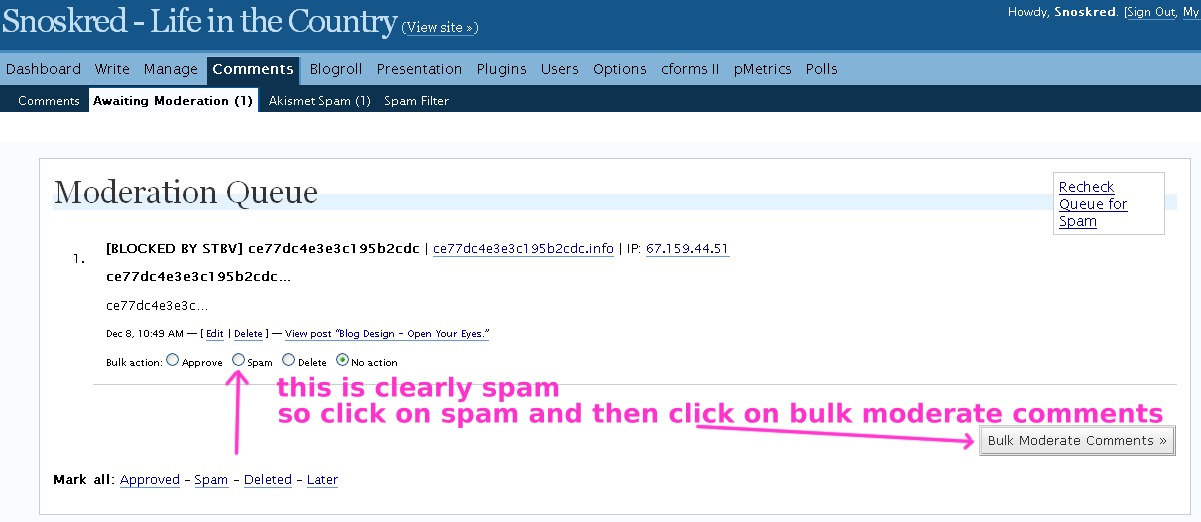
Clicking on comments in moderation will take you to the moderation queue. It looks like this –

Moderation Queue

So as you can see in that image there are four options underneath a comment.

  • Approve will let the comment go live on your blog so everyone can see it.
  • Spam marks the comment as spam and places it in the Akismet Spam folder
  • Delete is useful if someone accidentally submitted a comment twice. But remember, NEVER delete spam – always mark it as spam so Akismet can learn to identify it in the future.
  • No Action means nothing is done and the comment remains in the moderation queue.

Daily Task #2 –

Akismet Spam

Akismet is a wonderful thing. However it *is* open to abuse by bloggers who –

  • mark comments as spam when they are not really spam
  • mark comments as spam because they do not like the commentor

It also suffers as a spam filter when bloggers don’t regularly check their Akismet spam trap to make sure everything in there is spam. You do not get an email from WordPress to let you know when a comment has ended up in Akismet.

I believe it is part of your job as a blogger to make sure legitimate comments from your readers aren’t going into Akismet by mistake.

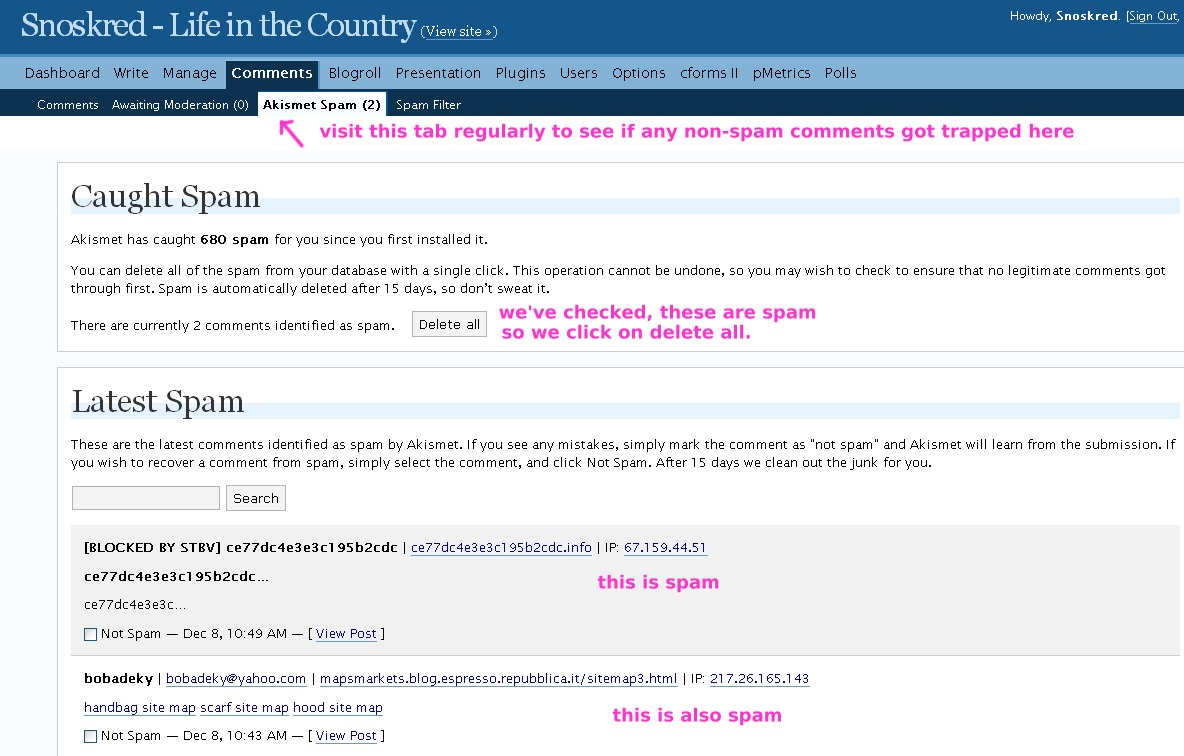
So how do you check it? I normally do it when I moderate a comment because Akismet is in the comments section and if you’ve just moderated a comment you’re already in there. You can see how many comments are in Akismet. Simply click on Akismet Spam and you’ll end up at this page –
Akismet Spam
Read through the comments. If there is anything there which you do not consider spam – and sometimes there will be, my comments regularly end up in Akismet, I will not speculate as to why! – you simply tick not spam, then scroll to the bottom of the page and click despam marked comments.
Despam Marked Comments
If all the comments are spam, you can click on delete all, and they will forever disappear. I find it is easier to delete the spam comments on the spot but you can choose to let them build up and Akismet will automatically delete them after 15 days.

There You Have It –

The above two things are fairly essential daily tasks on a WordPress blog and you may even find yourself doing them 4 or more times a day if you’re near the computer and you get an email to say a comment needs moderating, or maybe if you’re writing a post and you end up back at the dashboard and see there are comments to be moderated.

You Can Choose –

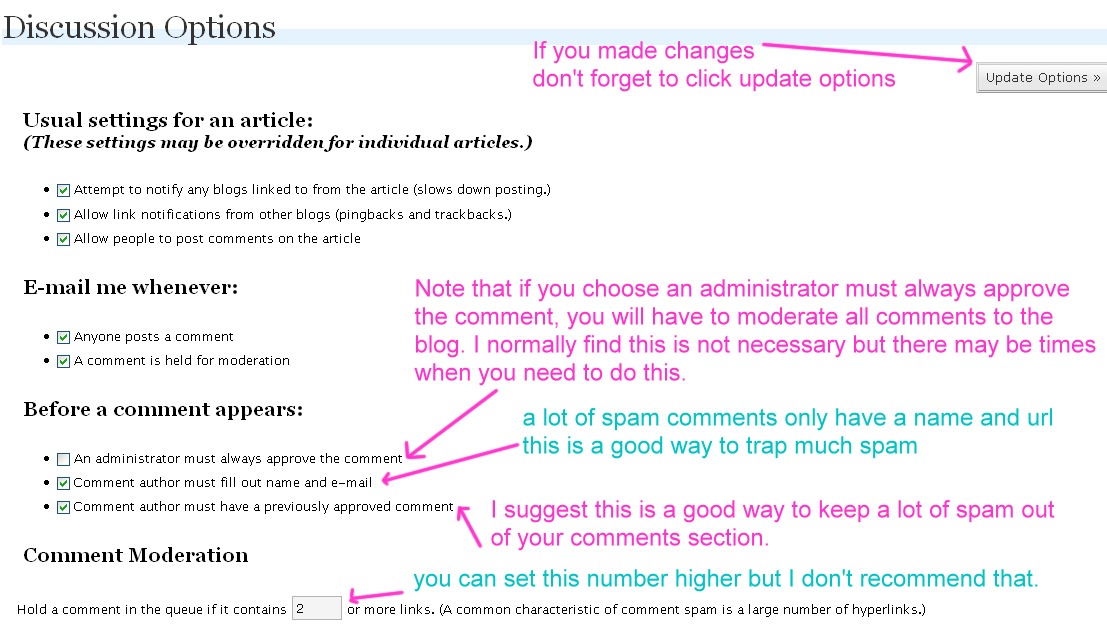
If you want more or less moderation on your blog you can go in and change the options. Go to Options (light blue) –> Discussion (dark blue) and you will see this screen.

Discussion Options

It is your blog, and you can set whatever settings you like. The way I set it is simply the best way I have found to manage comments for my blog. Your needs might be different. Just be careful because by making changes to this screen you may be opening up your blog to the spammers.

How Do You Manage It?

Let me know in the comments section how you manage comments on your blog. Do you moderate them once a day or more often? Do you have moderation for all comments? If yes, do you think you could try moderation for first time commentors only? Do you find that you delete a lot of comments from your regular commentors?

Any Questions?

Ask away by leaving a comment!

blogging tips, wordpress, Wordpress Training Wheels

A Quick WordPress Note

To those of you moving over to WordPress, you’ll often get an email from me describing how to do something. I prefer to give instructions on how to do it instead of just doing it for you, so you can learn. ;) An email might contain instructions like this –

Go to –
options (light blue)
permalinks (dark blue)

What is the light blue and dark blue all about? It’s about the menu at the top of the screen – it looks like this, click for a larger image.

Wordpress Menu

So you see there are three colors I might refer to – Medium Blue which is at the top, Light Blue which is in the middle, and Dark Blue which is at the bottom. When you move to different places in the light blue menu, you see different things appear in the dark blue menu. For example – the options menu, which you will see me refer to often as it is where the majority of the plugins live. See how there’s a lot more things in the dark blue bar in this image? Click for a bigger view.

The WordPress Options Menu

Coming up soon – comments, spam and moderation.

Wordpress Training Wheels

Oh! My Plugins!

You may have noticed that I put a page up with the list of plugins I use here on the blog.

Advanced TinyMCE Editor

Basically this plugin gives you much greater ability to change the look of your posts than you usually have in WordPress. It contains everything but the kitchen sink – from advanced color picker to add custom characters to tables. The best part is that it is fully customisable – you can remove any of the buttons for things you don’t use regularly. I love it!

Akismet

Akismet is the most well known of the anti-spam plugins available with WordPress. Basically it checks comments to see if they are spam. It takes information from other bloggers using the plugin as well, so spammers are pretty much screwed.

Unfortunately that means it can sometimes get it badly wrong – some bloggers who comment a lot around the place tend to end up in Akismet. That includes me – I’ve had to drag my own comments out of there from time to time. This is not surprising, because not all bloggers are as intelligent as you and I are, and they don’t take the time to visit someone’s blog and see if they are a real person who just comments a lot before marking their comment as spam.

And of course, let us not mention those bloggers who put people in Akismet just because they don’t like what they said in their comment, or they have a personal grudge against that blogger. Oh, we just did. Oops.

Akismet requires a bit of work from me as a blogger, I need to keep a close eye on it to make certain it is not putting legitimate comments into spam. However it does catch a lot of spam too, so it is worth using.

All in One SEO Pack

This plugin helps you when it comes to search engines. I can’t quite explain how but the guys over at the home of the plugin do a better job so visit the site and read about how it works. I like it but sometimes I’m too lazy to write the things myself so that is where the auto generate comes in handy.

cforms II – Contact Forms 2

This is a really important plugin and I highly recommend it. This does everything necessary to allow me to have the contact me page and for the messages sent using that page to get to me. You even have choices with how it looks. Pure brilliance.

Different Posts Per Page

This plugin allows you to set the amount of posts seen on different pages. Oddly enough exactly as the name of the plugin suggests! Go figure. ;) But it works a treat and it is much better than having everything on your blog at the same amount of posts you want on your front page. I have 4 posts on the front page, and something like 25 on all other pages now.

FeedBurner FeedSmith

This plugin basically works like a funnel forcing all options of reading your feeds into feedburner. That’s pretty important. I don’t have the technical terms to explain precisely why. It just is.

Google XML Sitemaps

This plugin is not just for Google – it creates a sitemap which Ask.com, Google, Live Search and YAHOO can all understand and access and it notifies those search engines when your site is updated.

Lucia’sLinkLove

Ah Lucia, how do I love thee? Let me count the ways.. The trouble with being a do follow blog is that some spammy bloggers and spammers in general will drop by and leave a comment just to get a link back to themselves. They might say intelligent sounding things, leave long comments, or they might be lazy and just say “Great Site”. Yeah right. Tell me something I don’t already know! ;)

However if you use Lucia’s Linky Love, you can set the number of times someone has to comment before their link is made do follow. You can choose anything from 3-10 times. It is a great way of rewarding your regular commentors for leaving comments yet at the same time not giving links to spammers or lazy people just trying to build links to their site.

Maintenance Mode

This plugin allows you to put WordPress into maintenence mode if you need to take your site offline in order to update – and it allows you to put a page up to let people know how long the site will be down for. That page can be customized to suit yourself, also.

Very handy, especially if you have a test blog – nobody else can get in there at all, you can have a page that says “This is a test blog, visit the real blog at blahdeblah” yet you can login and work on the test blog.

pMetrics

pMetrics is a stats tracker. They give you a free 30 day trial of their full version tracker. I tried it out and liked it so much I signed up for a year at $19.95. The design of the tracking site is pure heaven on the eyes – it is the best looking tracker I’ve ever seen. Plus, the tracker works ok too! Though no tracker gives you 100% accurate results, this one is reasonably accurate. It has some great options like “spy” where you can see live tracking results from your blog.

Similar Posts

This plugin displays a list of similar posts to the post being read. It can be a great way for people to find more information on that topic – and an excellent way to draw people to other pages within your site. You can set the number of posts to show, as well.

Simple Trackback Validation

I’m borrowing the description of this one from the plugin page in my WordPress because it puts what it does better than I can – Eliminates spam trackbacks by (1) checking if the IP address of the trackback sender is equal to the IP address of the webserver the trackback URL is referring to and (2) by retrieving the web page located at the URL used in the trackback and checking if the page contains a link to your blog.

Sociable – AntiSocial Version

I’m using a hacked version of this plugin created by the great Andy Beard himself called “AntiSocial”. It includes no follow on all the links (to save your link juice for things other than social bookmarking sites) and it also has a few different options within it – for Sphinn and StumbleUpon which are two of my most used social bookmarking sites.

Subscribe To Comments

Enables your commentors to subscribe to comments – this is a wonderful thing. It means often discussions continue on longer than they would without it. And sometimes you will find months later someone will comment on a post and generate a whole new discussion. Brilliant!

TanTanNoodles Simple Spam Filter

I am seriously crazy about this plugin but The Other Half has modified it slightly so that it works better. The original version looks for certain patterns which are present in a lot of spam emails and it also allows you to put in words often used by spammers to make sure those words don’t get past the plugin again.

The spammers are always changing their methods in order to get their spam past filters like this. I noticed they were using a lot of different mis-spellings for common drugs but the actual URL to their site was always spelt correctly. The plugin did not seem to check URL’s for the often used words. So the other half modified the plugin so that words put in will be rejected whether they are in the comment itself or the URL entered by the spam bot. This means all the drug spam is automatically rejected now. I’ll have to get the other half to write a post on how to modify it sometime.

Between moving to WordPress on October the 9th and writing this on the 20th of November, TanTan has blocked 3631 spam comments. Because it blocks them before WordPress has to deal with them, this has saved a lot of load on my blog. Joe Tan explains a bit more about saving CPU cycles and load on the home page of this plugin, seen below. (the modified version is what you would get on your blog if you hosted with us, it is fantastic)

Where did they go from here?

This shows you where other readers went from the blog post you’re currently reading. At the bottom of any page on my blog below the comment box you will see “Readers who viewed this page also viewed” and then a list of any other pages they may have viewed.

WordPress.com Stats

Another stats tracker. You need an API key from WordPress.com in order to use this one. You can access it from within your WordPress Dashboard, which is very handy. Not that I check my stats anywhere near as often as I used to but I will generally land in there once a day because the stats give you a quick overview of referrers, top posts viewed, search engine terms and outgoing clicks for both today and yesterday. So it’s an easy way to see what is going on with my site at a glance.

wp-cache

Ok so I’m not the most technical of people. Better you read the site of the person who wrote it rather than listen to some garbled explanation from me. But simply put, it caches your blog to make your site faster. It can be really handy for me sometimes when I get a big amount of incoming traffic at once which does happen from time to time.

WP-Polls & WP-Polls Widget

Yay for polls. Basically it allows you to have polls but there’s a lot of functionality within this plugin. It does a lot of stuff related to polls. :)

WP AJAX Edit Comments

Found at one of my all time favourite blogs, the Reader Appreciation Project, this plugin enables your commentors to edit their comments after posting them. I find this to be much better than the “preview comments” type plugins. My commentors have used this option 37 times so far!

Youtube Brackets

Makes it a lot easier for you to embed you tube videos. ;) Read the site below for more info on that.

blog housekeeping, wordpress

Basic HTML For Bloggers November – Tech Tuesday

Every Tuesday in November I am showing you how to do one simple thing with HTML. Today it is how to put in a little line break. Like this –


The HTML code to do the line above looks like this –

Horizontal Rule

HR means Horizontal Rule – rule a horizontal line. ;) It really is that simple. But you can make it more complex if you want to. You can add a few things to it in order to make it look different, be shorter, be one dimensional. Here’s some of the extra codes you can use.

No Shade


NOSHADE means to be flat and one dimensional.

Size


Size obviously relates to the height of your horizontal rule. You can easily change the size of your horizontal rule by simply adding size=X – X being the number you want.

Width


There are two ways you can choose what width you want. Pixel size and percentage. I suggest to stick with percentage for the most part because it will automatically adjust itself accordingly.

Align


You cannot use align without using width. Center is probably the one you would use most. If you use width you may find that the HR centers itself automatically.

Color


So there you have it. The Horizontal Rule. Try one out in a post today!

Further Reading –

Some HTML Tips & Tricks here

If you know nothing about HTML, this is where you start
Getting Started Tutorial
Learn Basic HTML For Your Website
Web Safe Color Chart
Non-dithering colors
How to Style an Unordered List with CSS

HTML Reference And Learning Websites –

HTML Code Tutorial
HTML Help
HTML Tutorials At W3
HTML Goodies
HTML Dog
Learn HTML And CSS

blogging tips, html, tuesday think tank

NaBloPoMo Time Again..

It is that time of year again – November 1. I’ve just started my NaBloPoMo commenting challenge and I’ve found quite a few blogs I commented on during last year’s commenting challenge already, how cool is that? I like to do things backwards so I began at the letter Z.

Are You Missing Out On The Fun?

If you have not already signed up for NaBloPoMo but you want to take part you might want to wander over and sign up now.

I can’t believe an entire year has gone by since I found so many wonderful bloggers during the last NaBloPoMo. It’s wonderful to be getting out there and looking at blogs which are completely new to me again.

However there is one downside – Blogger and the Word Verification thing again.

A tip to bloggers who are using blogger –

You’re not going to get spam if you turn word verification off, however you are probably getting a lot less comments with it turned on because often it makes me retype in the words 3 or 4 times – I *almost* give up. The spammers are far too busy targeting WordPress blogs. This blog is less than a month old and already TanTan Noodles has blocked 1278 spam comments. Akismet has blocked 202. I never saw any spam like this when I was on Blogger.

Captcha Word Verification

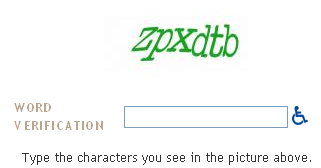
Blogger users will be familiar with Captcha word verification, it looks like this –
Word Verification

The reason it is exists is to stop spam bots posting comments on your blog. However it could be stopping regular human people from posting on your blog. You only need to turn word verification on when you’re being targeted by a spam bot which is extremely rare on Blogger – as in you’ll be getting a boatload of comments in a very short amount of time – and this will stop the spam bot from posting more comments. May I recommend you turn it off in the meantime? Especially if you moderate your comments before they are posted – no spam comments will be posted because you won’t allow them through, right?

Julie Pippert recently posted about having trouble with Captcha and if you read her post you will see you might be missing out on comments if you’re using it.

NaBloPoMo

A Quick Bloggy Update

If you commented over the last week, I’ve just finished replying to all the comments. Apologies for the delay – it’s been a huge week of learning WordPress for me.

I have a test blog up and running and it looks fantastic – no, you’ll have to wait till I launch it ya’all! WordPress is much simpler than I expected and after just one day of playing with it I’m feeling very comfortable – and about ready to flick the switch over to the new blog. I’m going to take some time to play with it. I’d say next Monday will be the moving day.

Let me now admit how terrified I have been about this process. Several times over the last few days the voice in my head has been screaming “RUN AWAY run away! Stay with Blogspot, don’t switch to WordPress. You’re not smart enough. You don’t have the technical knowledge for this”. Well that’s a load of baloney. I am smart enough, I do have the technical knowledge. It turns out all my fears were simply because I did not know how things worked – and now that I do, I can honestly say WordPress is simpler and easier to use than Blogger is.

I did not know how easy it was to modify templates – it is a snap. Just yesterday I was considering paying some big money to get my own unique template built. I completely believe you have to invest in your blog and I’m happy to pay for something that is great and that I was happy with and would never want to change. However I can take a good looking template and switch the colors, change the graphics, just tweak it to suit myself.

I was worried about plugins. I was worried about security. I was worried about a lot of things. Now, I have faith in myself that I can deal with whatever happens. Confidence is a great feeling.

Back in a few hours with a CD review. ;)

blog housekeeping, wordpress

Basic HTML for Bloggers.

Blogging is like learning another language by itself, and there’s a lot of people sitting in the corner with their hands over their ears screaming “NO! I Will Not Learn This HTML! I Just Want To Blog!” – I believe the reason is, people think this is too technical for them.

Well I have good news for you. It’s not technical. It is simply a different language. HTML stands for HyperText Markup Language. If you’ve ever tried to learn a language you’ll know you need to practice and use it often in order to be successful, and you have to learn what things mean in order to understand it.

HTML is no different.

It’s just like French, only more useful – unless you live in France. It’s just like Norwegian, only less pretty looking. It’s just like English, only if you use the wrong spelling or grammar it can stop your site from working right and cause you to have a minor meltdown where you end up curled into a ball on the floor, rocking back and forwards.

The good news –

You don’t need to learn to speak this language out loud, or learn to remember it if you don’t want to. Using this language is a simple matter of copy and paste. Eventually you may learn the code yourself and can write it on your own – even then you can still use copy and paste because it saves you time.. Also, there’s a lot of great sites out there where you can grab bits of code – almost like phrasebooks.

In this post –

The HTML will be put into images, just to make it easier for me to write the post. Do not fear, I’ve got a text file which accompanies this post – and it contains all the HTML I’m talking about today complete with instructions on how to modify it to suit you.

New To Computers?

Some of the people reading this may not know how to copy and paste, I’ll put links to instructions for that at the bottom of this post too – as well as an easy way to “steal” code from websites and blogs.. So let us begin.

Text Links –

Most bloggers use the option in their blogging platform to put in a link. This is time consuming and it means you have to have the page you are linking to open in your browser when you are writing the post in your blog. The code for this is so simple.

<a href="link">text</a>

In order to make a link, you need to copy the link and then paste it to replace link in the HTML. The quotation marks need to stay. You then put the text you want for the link where it says text – in between the brackets. So a link to me would look like this –

<a href="http://www.snoskred.org/">Snoskred</>

Colors –

There are 216 colors which are best for using on the internet because they don’t “dither” – they are solid colors. See Non-dithering colors for more info. What we want to talk about is how to change font colors in HTML. You can do this in your blog color scheme, but sometimes you will want to use it in blog posts or in your sidebars. It truly is child’s play.

<font color="#colorhere">text</font>

Where do you get the color codes from? Try the Visibone Color Lab or the Web Safe Color Chart

Lists –

<ul>
    <li><a href="link">text</a></li>
    <li><a href="link">text</a></li>
</ul>

<ol>
    <li>text</li>
    <li>text</li>
</ol>

Some people have seen the UL code around the place, they use it, they have no idea what it means or what it does. ;) It stands for Unordered List. This just means you can put a bunch of things together in a list. There is also OL which stands for ordered list and that kind of list will automatically put in numbers. There is a fantastic lists tutorial online – HTML Lists which explains lists a lot better than I can.

Centering –

Things tend to look better when they are centered. There’s two ways to do this in HTML and I am going to tell you the really simple one. Are you ready? This one is a doozy, ya’all. You better sit down.

<center>text</center>

Seriously, that is how simple it is. It has to be center, not centre.

You can see now this language is actually easier than a lot of the languages on the planet. It’s not like they’re taking the word newspaper and telling you the word for it is avis as they do in Norwegian. It just involves some brackets and looks complicated but truly, it isn’t. Don’t be scared of it.

Scroll Bars –

Sometimes you want to put something on your sidebar but you don’t want it to take up the amount of space it takes up. A blogroll is an excellent example of this.

Some people use blogrolling to maintain a blogroll. Unfortunately blogrolling uses Javascript – and therefore none of the links count in Technorati or on Google or the other search spiders.

If you want the links to count for the people you are linking to, you need to use the following HTML code – you can put links in there, or just text. I have both link and text scroll bars on my sidebar, can you see them?

<div style="overflow: auto; height: 100px">
<ul>
    <li><a href="link">text</a></li>
    <li><a href="link">text</a></li>
    <li><a href="link">text</a></li>
    <li><a href="link">text</a></li>
</ul>

If you want to change the height of the scroll bar, simply change the 100px to a lesser or higher number – ie 180px, 300px

I’m Ready To Get The Text File Now –

You can get a copy of all this html code in a simple text file with instructions on how to modify it right here – it is better to use right click and save as text file because if you view it in your browser you won’t see the code.

Copy And Paste

There’s a few links on the web which teach you to copy and paste – here are two simple and good ones.

How To Copy And Paste
The Basics of Cut and Paste

How To “Steal” Code

Sephy wrote a great blog post on this a while back.

How To “Steal” Code

Ready For More?

Sephy’s Tuesday Think Tank post (which is a companion post to this one) is fantastic this week, so make sure you go and read it! ;) I will link to it here as soon as he puts it online – which may be a little while because his internet just went offline and he’s gone to bed. Drop back in about 12 hours for the linky. ;)

Check out his post of Some HTML Tips & Tricks here!

Further Reading –

If you know nothing about HTML, this is where you start
Getting Started Tutorial
Web Safe Color Chart
Non-dithering colors
How to Style an Unordered List with CSS

HTML Reference And Learning Websites –

HTML Code Tutorial
HTML Help
HTML Tutorials At W3
HTML Goodies
HTML Dog
Learn HTML And CSS

It’s Up To You –

Learning is a choice. We all make choices in our lives. You might choose to learn the piano. You might choose to learn Norwegian, as I once did. Bloggers can choose to live in fear of HTML and code, or they can choose to dedicate 5-10 minutes a day to do quick HTML tutorials and start the learning process. You may decide only to learn the basics and that is fantastic in itself – doing that is much better than being scared of text on a screen.

Endless Capacity

We Humans have an endless capacity for learning – just consider how many song lyrics you hold inside your head. HTML is not just useful for blogs. If you learn it you can use it to design websites – for yourself and maybe for others. It may lead you onto learning other programming languages.

The Power Of The Internet –

If there is ever anything you don’t understand, aren’t sure about, or don’t know how to use, you can find out on the Internet by searching for it. Or, you can simply ask Sephy and I to make a Tuesday Think Tank on that topic. ;) We’ve done quite a few of these now.

Previously in the Tuesday Think Tank
21st August: RSS
14 Reasons Readers Unsubscribe From Your Blog
Tuesday Think Tank: All About RSS

28th August: Blog Templates
Blog Design – Open Your Eyes.
Demystifying Blogger Template Editing

4th September: Nofollow
Spam, Spiders And Do Follow, Oh My!
Say No! to Nofollow

11th September: Site Meters
Do NOT Rely On Your Site Meter.
Track Your Visitors with Google Analytics

18th September: Technorati
Technorati – Sending Out An SOS
The Ups (and Downs) of Technorati

Stumble It? –

If you liked this post you may want to stumble it.

Link To It?

If you have readers on your blog and this post would be useful to them, please link to it so they can read this and stop fearing HTML. ;)

Over To You –

Got any thoughts on HTML? Have I taken some of the scariness out of it? ;) Let me know if yes!

blogging tips, html, tuesday think tank